In this example, add an asteroid which:
(a) appears
(b) does damage
(c) blows up with laser hit
(d) makes enemies appear
Pick out an asteroid asset:

Asteroid asset choice
Drag into the hierarchy, position up and away from the player object, scale or rotate, or both.
Create asteroid prefab:
Drag and drop from Hierarchy to Prefabs folder in Assets. Set Additional Setings — Sorting Layer to Foreground.
Add Components of RigidBody 2D with Gravity Scale of zero (0). Add Circle Collider 2D with “Is Trigger” checkmarked.
Click the Edit Collider icon and resize close around the asteroid in the scene view, and click the icon again to finish.
Create asteroid script:
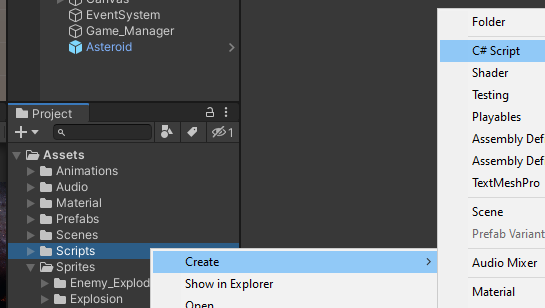
Create new Script
Name Script first, then highlight Asteroid in Hierarchy to display Inspector, then
(a) wait, then
(b) drag and drop Asteroid script from Scripts onto Inspector — Add Component,
(c) wait again. Double click on Scripts — Asteroid to go to Visual Studio to add behaviors.
Continually rotate asteroid in space:
using UnityEngine;
public class Asteroid : MonoBehaviour
{
    [SerializeField]
    private float _rotateSpeed = 3.0f;
    void Update()
    {
        transform.Rotate(Vector3.forward * _rotateSpeed * Time.deltaTime);
    }
}
Explosion VFX on asteroid:
Drag and drop first frame of animation into Hierarchy. Rename object without the “_0000.”
(a) Animate the frames.
(b) Prefab the animation
(c) Instantiate animation at location of asteroid.
Highlight Explosion object in Hierarchy and open the Animation window. Click Create and save name + “_anim” in the animations folder. Click record. Drag and drop the animation frames from Assets to the Dopesheet. Click record — off.
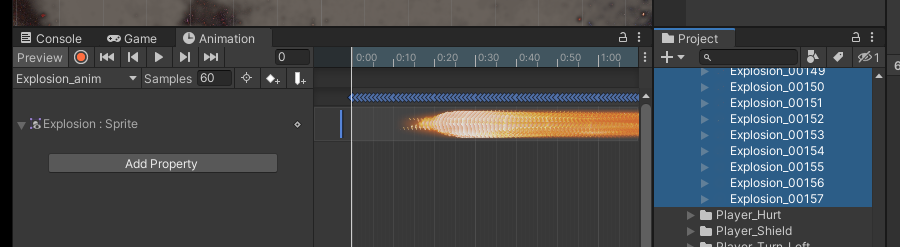
Create Explosion animation
A press of the Play icon will demonstrate the Explosion animation at (0, 0, 0).
Drag and Drop the Explosion object from Hierarchy to Project — Assets — Prefabs. If the game is run, the Explosion loops from the start at (0, 0, 0). Change Inspector — Additional Settings — Sorting Layer from “Default” to “Foreground.”
Connecting the Explosion with the Asteroid
Delete the Explosion from the Hierarchy. Click to highlight the Asteroid. In the Inspector — Overrides —Apply All to any prefabs.
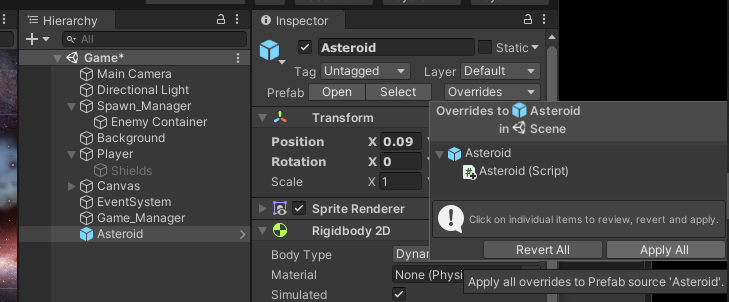
Asteroid Overrides
Inspector Settings
Highlight the Assets — Animations — Explosion_anim. In the Inspector, uncheck “Loop Time.” Change Inspector — Additional Settings — Sorting Layer from “Default” to “Foreground.”
Create a reference variable to hold an Explosion object, later needed to set its position equal to the asteroid position.
Method A
“GameObject newExplosion = …”
using UnityEngine;

public class Asteroid : MonoBehaviour
{
...
    [SerializeField]
    private GameObject _explosionPrefab;

    private void OnTriggerEnter2D(Collider2D other)
    {
        if (other.tag == "Laser")
        {
            Destroy(other.gameObject); // destroy laser

            // start explosion animation
            GameObject newExplosion = Instantiate(_explosionPrefab, transform.position, Quarterion.identity);
            if( newExplosion == null )
            {
                Debug.LogError("newExplosion (Prefab) == null");
            }

            // destroy explosion after three seconds
            Destroy(newExplosion, 3.0f);
            Destroy(this.gameObject);  // destroy asteroid
        }
    }
...
}
Method B:
From the online tutorial:
Create a new C# script to handle explosion behavior.
New Explosion script
Highlight Assets — Prefabs — Explosion and drag and drop the new Scripts — Explosion into the Inspector — Add Component area.

Explosion prefab with Explosion (Script)
Double click on Script to open Visual Studio
Here is the Explosion (Script):
using UnityEngine;

public class Explosion : MonoBehaviour
{
    void Start()
    {
        Destroy(this.gameObject, 3.0f );
    }
}
Explosion::Start() runs when instantiated in Asteroid.cs:
using UnityEngine;
public class Asteroid : MonoBehaviour
{
...
    [SerializeField]
    private GameObject _explosionPrefab;
...
    private void OnTriggerEnter2D(Collider2D other)
    {
        if (other.tag == "Laser")
        {
            Destroy(other.gameObject); // destroy laser

            // start explosion animation
            Instantiate(_explosionPrefab, Transform.position, Quaternion.identity); // triple_shot;

            Destroy(this.gameObject, 0.2f);  // destroy asteroid with delay
        }
    }
}
Reaching outside Classes
Here are the desired methods in another Class:
using UnityEngine;

public class SpawnManager : MonoBehaviour
{
...
    public void StartSpawning()
    {
        StartCoroutine(SpawnEnemyRoutine(5.0f));
        StartCoroutine(SpawnPowerupRoutine());
    }
...
}
(a) create reference variable of type, or outside class type.
(b) in the Start() assign the reference to point to the component of the outside class.
(c) Call the outside class’ method.
using UnityEngine;
public class Asteroid : MonoBehaviour
{
    private SpawnManager _spawnManager;
...
    void Start()
    {
        _spawnManager = GameObject.Find("Spawn_Manager").GetComponent<SpawnManager>();
    }
...
    private void OnTriggerEnter2D(Collider2D other)
    {
...
        _spawnManager.StartSpawning();   // Do this before the Destroy()

        Destroy(this.gameObject, 0.2f);  // destroy asteroid with delay
    }
}
If a pause in time is needed, add a yield-return-wait statement:
using UnityEngine;
public class SpawnManager : MonoBehaviour
{
...
    IEnumerator SpawnEnemyRoutine()
    {
        yield return new WaitForSeconds(2.0f);
...
    }
}
Adding an Animation without Destruction
This example adds a thruster flame to a player spaceship.
(a) Locate the starting animation frame among the sprite assets.
(b) drag from Assets to Hierarchy — Player.
(c) Rename without the “_0000” and adjust position and scale in the Inspector.
(d) Change Inspector — Additional Settings — Sorting Layer from “Default” to “Foreground.”
Before changes:
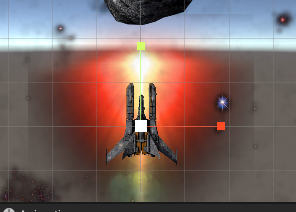
Adding animation before changes
After position and scaling:
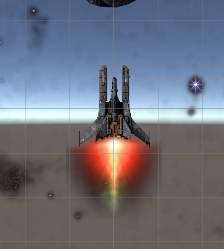
After position and scaling
Animate the Thruster object
(a) Highlight object in Hierarchy.
(b) Open Animation view.
(c) Create new animation “Thurster_anim” saved to Animations folder.
(d) Click the record button.
(e) Highlight all the Thruster frames in Assets — Sprits and drag to the Dopesheet.
(f) Click the record button to stop.
Adding Animation with Destruction (not to a prefab)
A fireball animation is displayed after the Player behavior loses it’s third life.
(a) Locate the asset animation first frame and drag up to the Hierarchy Player object.
(b) Change Additional Settings — Sorting Layer from “Default” to “Foreground” and increase Order in Layer from “0” to “1” to be on top of Player ship object.
Place a Fire on the right wing, name “Right_Engine.” Right click and Duplicate a second copy to position on the left wing and rename “Left_Engine.” Match up the same Position.Y values, and the opposite Position.X values — like (-1.5, -3.5, 0) and ( 1.5, -3.5.0 ).
The engine fires start the game turned off, so uncheckmark each object in the Inspector.

Left Engine object turned off, unchecked
Create the reference variable for each side.
using UnityEngine;

public class Player : MonoBehaviour
{
...
    [SerializeField]
    private GameObject _rightEngine;
    [SerializeField]
    private GameObject _leftEngine;
}
Save.
In the Unity Editor, highlight the Player and drag and drop the Right_Engine and Left_Engine onto the variable parameter values.
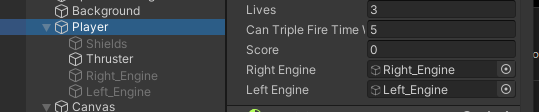
Drag and drop Left_Engine and Right_Engine into variable values
Add display logic into Damage() code.
public class Player : MonoBehaviour
{
...
   public void Damage()
    {
...

        _lives -= 1;

        if( _lives == 2 )
        {
            _rightEngine.SetActive(false);
            _leftEngine.SetActive(true);
        }
        else if( _lives == 1 )
        {
            _rightEngine.SetActive(true);
            _leftEngine.SetActive(true);
        }
...
    }
...
}
Add animation to the Right_Engine and the Left_Engine.
(a) Highlight first side.
(b) Click the Animation tab and create a new Animation “Engine_Failure” in the Animations folder.
(c) Press the Record button and highlight, drag and drop the Fire sprite frames into the Dopesheet
(d) Press the Record button again to stop.
Notice the name in Project — Assets — Animations is the Hierarchy name (Right_Engine). Rename to match the name used in the Saved As folder (Engine_Failure).
Click on Right_Engine in the Hierarchy to verify the name change in the Inspector — Animator

Right_Engine animator with Engine_Failure animation controller
Drag and drop the animation controller into the Left_Engine object and verify the correct Animator — Controller value is listed.
Save and run game.