Create group
sudo addgroup groupname
# or
sudo groupadd groupname
Verify group creation
tail /etc/group
This will display the last few lines of the file, which should include the new group's entry
Optional: Creating a group with a specific Group ID (GID) By defaul, the system assigns the next available GID. You can specify a GID using the --gid or -g option
sudo addgroup groupname --gid 1005
sudo groupadd -g 1005 groupname
Next steps: Adding users to the group
# Debian-specific command
sudo adduser username groupname
# Universal Linux command (use -aG options)
sudo usermod -aG groupname username
the -aG options ensure the user is appended to the specified supplementary groups without removong them from other groups.
x@c7:/opt$ sudo groupadd ndev
[sudo] password for x:
x@c7:/opt$ tail /etc/group
...
jci:x:1000:
x:x:1001:
ndev:x:1002:
x@c7:/opt$

x@c7:/opt$ sudo usermod -aG ndev x
x@c7:/opt$
To change ownership recursively (including all subdirectories and files)
sudo chgrp -R
Change the Group Permissions
Next, use the chmod command to set the desired permissions for the group. You can use either symbolic (letters) or numerical (octal) notation.
Using Symbolic Notation (Recommended)
This method lets you specifically add or remove permissions for the group without affecting the owner or others.
g+rwx: Adds read, write, and execute permissions for the group.
g-w: Removes write permissions for the group.
g=rw: Sets the group permissions to exactly read and write (removing execute if it was present).
Examples:
To give the group full read, write, and execute permissions on a directory:
chmod g+rwx /srv/shared_data
To do this recursively for all files and subdirectories:
chmod -R g+rwx /srv/shared_data
Using Numerical Notation
Numerical notation sets permissions for the owner, group, and others simultaneously. A common setting for shared directories is 775, which grants full permissions (read, write, execute) to the owner and the group, but only read and execute to others.
Permissions breakdown:
5 = Read (4) + Execute (1)
Example:
To set permissions to 775 (owner: full, group: full, others: read/execute) on a directory:
chmod 775 /srv/shared_data
To do this recursively:
chmod -R 775 /srv/shared_data
Verify the Changes
After running the commands, verify the new ownership and permissions using the ls -ld command:
ls -ld /srv/shared_data
The output will display the permissions (e.g., drwxrwxr-x) and the owner/group (e.g., user consult), confirming your changes.
From
x@c7:~$ sudo mkdir /opt/nginx_server_project
[sudo] password for x:
x@c7:~$
x@c7:/opt$ cd /opt/nginx_server_project
x@c7:/opt/nginx_server_project$
Make the changes to the project directory group name and permissions
Before:
x@c7:/opt$ ls -l
total 4
drwxr-xr-x 2 root root 4096 Jan 31 08:25 nginx_server_project
x@c7:/opt$
After:
x@c7:/opt$ sudo chgrp -R ndev /opt/nginx_server_project
x@c7:/opt$ sudo chmod -R g+rwx /opt/nginx_server_project
x@c7:/opt$ ls -l
total 4
drwxrwxr-x 2 root ndev 4096 Jan 31 08:25 nginx_server_project
x@c7:/opt$
Add user to group
x@c7:~$ sudo usermod -aG ndev x
Return to instructions from blog.logrocket.com:
Still need to create npm with sudo.
x@c7:/opt$ cd nginx_server_project
x@c7:/opt/nginx_server_project$ sudo npm init -y
[sudo] password for x:
Wrote to /opt/nginx_server_project/package.json:

{
  "name": "nginx_server_project",
  "version": "1.0.0",
  "description": "",
  "main": "index.js",
  "scripts": {
    "test": "echo \"Error: no test specified\" && exit 1"
  },
  "keywords": [],
  "author": "",
  "license": "ISC"
}

x@c7:/opt/nginx_server_project$
Continue on:
x@c7:/opt/nginx_server_project$ sudo touch server.js
x@c7:/opt/nginx_server_project$ sudo vi server.js
Now it’s time to build and start the server. Let’s define two extra subdomains as a means to test that our application is fully functional:
const http = require("http");
const server = http.createServer((req, res) => {
const urlPath = req.url;
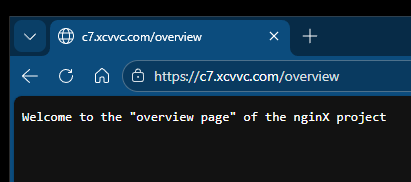
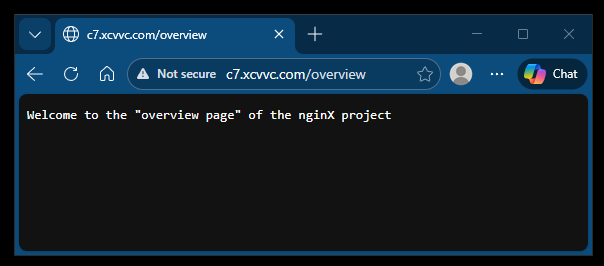
if (urlPath === "/overview") {
res.end('Welcome to the "overview page" of the nginX project');
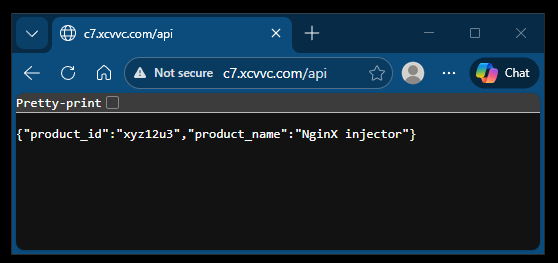
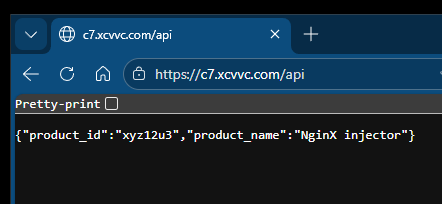
} else if (urlPath === "/api") {
res.writeHead(200, { "Content-Type": "application/json" });
res.end(
JSON.stringify({
product_id: "xyz12u3",
product_name: "NginX injector",
})
);
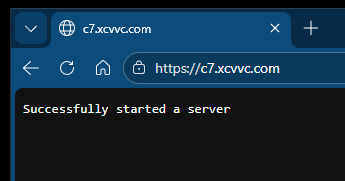
} else {
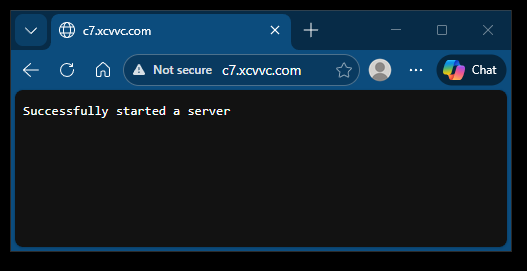
res.end("Successfully started a server");
}
});
server.listen(3000, "localhost", () => {
console.log("Listening for request");
});
We created a server with a Node.js HTTP module that we imported using the require function in the above code. Within our server, we’ll render two different responses, depending on our current route. The two routes are /overview and /api.
On the /overview subdomain, we’ll render a plain text, while on the /api, we’ll render a JSON object. The above application will be accessed on the Public IPv4 address of your virtual machine — e.g., 34.211.115.4 on port 3000.
x@c7:/opt/nginx_server_project$ ls -l
total 8
-rw-r--r-- 1 root root 234 Jan 31 09:34 package.json
-rw-r--r-- 1 root root 542 Jan 31 09:54 server.js
x@c7:/opt/nginx_server_project$
Now that the Node server application is ready, let’s install Nginx and configure it.
x@c7:~$ cd /etc/nginx/sites-available
x@c7:/etc/nginx/sites-available$ sudo touch myserver.config
x@c7:/etc/nginx/sites-available$ sudo vi /etc/nginx/sites-available/myserver.config
x@c7:/etc/nginx/sites-available$
Paste in the following configuration:
#The Nginx server instance
server{
    listen 80;
    server_name wach.quest;
    location / {
        proxy_set_header X-Forwarded-For $proxy_add_x_forwarded_for;
        proxy_set_header Host $host;
        proxy_pass http://127.0.0.1:3000;
        proxy_http_version 1.1;
        proxy_set_header Upgrade $http_upgrade;
        proxy_set_header Connection "upgrade";
        # location /overview {
        #     proxy_pass http://127.0.0.1:3000$request_uri;
        #     proxy_redirect off;
        # }
    }
}
The above configuration has Nginx listening on port 80 on your-domain.com. The '/' is your Uniform Resource Identifier (URI) with the following properties:
• proxy_pass HTTP: Instructs Nginx to proxy all requests matching the location pattern to an upstream (backend) server
•proxy_http_version: Converts the incoming connection to HTTP 1.1
• proxy_set_header Upgrade: Converts the proxied connection to type Upgrade because WebSockets only communicate on upgraded connections
•proxy_set_header Connection: Ensures the connection header value is Upgrade
Save the changes and exit the file by clicking the Esc key. Then, type the command :wq and hit the Enter or Return key.
Next enable the new config file in the sites-available directory with a symbolic link in the sites-enabled directory
x@c7:/etc/nginx/sites-available$ sudo ln -s /etc/nginx/sites-available/myserver.config /etc/nginx/sites-enabled/
x@c7:/etc/nginx/sites-available$

x@c7:/etc/nginx/sites-available$ ls -l /etc/nginx/sites-enabled
total 0
lrwxrwxrwx 1 root root 42 Jan 31 12:20 myserver.config -> /etc/nginx/sites-available/myserver.config
lrwxrwxrwx 1 root root 40 Jan 27 09:17 with-ssl.conf -> /etc/nginx/sites-available/with-ssl.conf
x@c7:/etc/nginx/sites-available$
Remove the symbolic link to the other configuration
x@c7:/etc/nginx/sites-available$ sudo unlink /etc/nginx/sites-enabled/with-ssl.conf
Change the permissions to the symbolic link
x@c7:/etc/nginx/sites-available$ sudo chmod 644 /etc/nginx/sites-enabled/myserver.config
x@c7:/etc/nginx/sites-available$ ls -l /etc/nginx/sites-enabled/
total 0
lrwxrwxrwx 1 root root 42 Jan 31 12:20 myserver.config -> /etc/nginx/sites-available/myserver.config
x@c7:/etc/nginx/sites-available$
Test the configuration
x@c7:/etc/nginx/sites-available$ sudo nginx -t
nginx: the configuration file /etc/nginx/nginx.conf syntax is ok
nginx: configuration file /etc/nginx/nginx.conf test is successful
x@c7:/etc/nginx/sites-available$
Restart NginX
x@c7:/etc/nginx/sites-available$ sudo systemctl restart nginx
x@c7:/etc/nginx/sites-available$
Change to directory of Node.js application
x@c7:/etc/nginx/sites-available$ cd /opt/nginx_server_project
x@c7:/opt/nginx_server_project$
Start application
x@c7:/opt/nginx_server_project$ node server.js
Listening for request
Open a browser and access the Node.js application using the domain http://c7.xcvvc.com:
Access the /overview endpoint of the application http://c7.xcvvc.com/overview.
Test if the api is accessible http://c7.xcvvc.com/api.